Shopping Cart

No products in the cart.

DRSABCD First Aid Action Plan- The Ultimate Guide!

You Asked, We Listened – The Ultimate DRSABCD Guide Just Got Even Better!

We’ve updated our Ultimate Guide to DRSABCD again! 🎉 Now with improved formatting, easier navigation, and interactive tabs to help you quickly find what you need. Plus, we’ve sped things up, so you can learn faster and more efficiently. (Updated 10/02/2025)

At Accidental Health & Safety, our mission is simple: equip as many people as possible with the knowledge and confidence to act in an emergency. This guide goes beyond just listing steps—we break down the why behind each action, use real-life scenarios, and answer common FAQs to clear up misconceptions.

💡 What’s New?
Informative videos – See DRSABCD in action.
Better formatting – Easily explore each step & section.
Faster learning – No fluff, just what you need to know.

Whether you’re a beginner or just need a quick refresher, this guide is designed to help you build confidence in first aid. Let’s work together to make Toowoomba & our communities safer—one DRSABCD step at a time! 🚑💪

What is the DRSABCD action plan?

DRSABCD an acronym used in First Aid. In an emergency, remembering this acronym and the steps involved can help you provide basic life support. In fact, in our first aid courses this is the key thing we want you to remember after you leave! If you want to learn more about first aid for minor conditions, read more here.

Let’s look at what each step entails.

Danger

Many emergencies are made worse because safety is forgotten


What Happens: When confronted with an emergency, our adrenaline kicks in. Adrenaline is great! It can help us overcome our fears. However, It can also make us blind to the real dangers in emergencies. It can be easy to just rush in on instinct, without thinking.

Click the next tab to see 3 scenarios where danger could easily be forgotten

Imagine you an electrician is doing work at your home. He is up on a ladder installing a light fitting. Suddenly, all the lights go out and you hear a smashing noise. What is your instinct reaction? To race in. But what dangers could be present? An electrical circuit could be live and there could be shattered glass from the light fitting. If you were to rush in, their could be a real chance of electrocution and cut feet.

Lesson 1: Make sure to take a deep breath and observe the surroundings.

Imagine you are driving on a country road. There is a car ahead of you. Suddenly, a kangaroo jumps out in front of that car. The car swerves to miss the kangaroo and crashes into a powerpole. You pull over to offer help. What dangers could you encounter? Electrical lines could be down, petrol could be leaking from the car, other cars coming up the road could be hazardous. And let’s not forget a angry Kangaroo!In view of the hazards, you might feel it’s unsafe to proceed. So, what can you do to help? You can call emergency services. It’s also important to monitor the situation, if those involved in the crash can get out, they will likely need your assistance. Also, other people might rush in without thinking and injure themselves, so it’s a great idea to warn them.

Lesson 2: If it’s too unsafe to help, call an ambulance and monitor the situation. Make sure to keep those around safe.

Imagine you’re on a family outing at a local waterhole, a beloved spot for swimming, fishing, and picnicking. Suddenly, your tranquility is broken by a shout near the waterhole. A child who was previously splashing near the bank now appears to be struggling in deeper waters.

Your immediate instinct might be to jump in and swim to the child’s aid. But is the depth and current too strong, is the waterhole banks slippery or rocky. If the person panicking, they could unintentionally pull you under in their struggle.

Lesson 3: In this scenario, your instinct to help is admirable, but leaping in without considering these factors could lead to further danger. Always remember the first rule of first aid: ensure your own safety before attempting to help others. After all, becoming a casualty yourself will not help the situation.

So let’s recap:
The first D in DRSABCD is danger. Always remember to take a deep breath and observe the surroundings. Try to make the scene safe. If it’s too unsafe to help, call an ambulance and monitor the situation. Make sure to keep those around safe.

Response

The next area in DRSABCD is response. In our day to day life we automatically check for response. For example, if one of your friends kicks their toe, what’s the first thing you say to them? are you ok mate?

What is involved in checking for response in an emergency? We have a great acronym to help: COWS. Cows stands for:

C- Can you hear me O- Open your eyes W- What’s your name S- Squeeze my hand

When someone is injured, trying these steps gives a great indication of whether they are responsive or not. If they don’t respond to your talk or touch, then it’s likely they are not responsive. Australian Resuscitation Council guidelines also recommend grasping and squeezing the persons shoulder to try to elicit a response as a last resort.

What happens next?

If you get a response what do you do next? It’s important to check for other injuries and determine what treatment is needed. After that, look for ways to help the patient be more comfortable. During the whole process, try to keep them engaged in conversation if possible. A person’s condition can rapidly change, so our conversation helps us to keep checking their responsiveness.

If you don’t get a response what’s next? Follow the rest of the steps in the DRSABCD action plan.

What classifies as responsive? If you go through the COWS acronym, and you get a minor response, like groaning without their eyes opening, would you say it counts as a response. No. It’s not enough for them to be classed as responsive. If that’s the case we treat them as an unresponsive person.

Want to learn a little more about checking for response? Check out our article What is Cows in CPR

Send For Help

It’s a race against time

When an emergency unfolds, seconds can morph into life-altering moments. It’s a race against time where the arrival of an ambulance isn’t just a relief, it’s a lifeline. The quicker help arrives, the better the chances for a critical patient to survive. It’s as if each tick of the clock can tip the scales between life and death. That’s why “S”, standing for “Send for Help”, plays such a crucial role in the DRSABCD action plan. Many First Aiders have gone 10, or even 15 minutes into a rescue before they’ve realised an ambulance wasn’t called

What questions may you have about sending for help in an emergency?

Do i have to check for danger and response first before calling 000

No. Often we can determine the seriousness of a situation before we check for dangers and responsiveness. For example, if someone is hit by a car and thrown in the air, we would want to immediately send for help.

Who should send help?

A: If there is a bystander, we can use them to send for help. That frees us up to perform first aidIs there a special number for mobiles?

You could call 112, but In phones made since 2002, there is no difference in dialling 000 and 112 in Australia. The only advantage of 112 is that it is an international number and can be used in a number of other countries.

Does dialling 112 or 000 from a mobile can connect you where there is no range?

Fact: If you have no service, your phone will try to connect you to another network that has range. For example, if you are with the Vodafone network, your phone will attempt to connect you to 000 operators through the Telstra Network. However, if no network has signal, you will not be able to reach 000.

When out of range, will dialling 000 connect you to satellites?

Mobile phones generally do not have the capability to connect to satellites, however some newer models have emergency satellite capability. Does Dialling 911 work?

911 does not automatically redirect to 000. However, some phones have an automatic feature that redirects for you.

Hot Tip: If you are the only person at the scene, why not put your phone on speaker when calling emergency services. That way you can be free to perform CPR.

A light bulb suggesting an idea

Airways

In an emergency, people have died because no one forgot to check the airways. For example, people have died in a car crash because while unconscious the position with their head forward has obstructed their airways. That’s why in first aid, airways are a big priority!

What do you need to know about airways? It’s very common when someone has suffered a life threatening illness or injury that fluid, such as blood or vomit is in their airways. To check for this, you will need to open their mouth and look inside. What happens if you find fluid inside? You will need to roll them onto their side temporarily to drain the fluid.

How do you do it?

  1. Put the arm closest to you over the chest
  2. Put the other arm out straight
  3. Lift the knee
  4. Use the knee and shoulder as push points to roll the person to their side
  5. Allow the knee to hit the ground
  6. Grab their hand flatten it out and pull it into the body to keep the body from rolling face down
  7. Tilt their head back gently
  8. Scoop fluids out with your finger to speed up process

Airway Technique: The Chin Lift

If a person has no fluid, and are unconscious on their back, that presents another problem. When unconscious, the tongue is relaxed, and could block their airways. How can we help? We do what is called a chin lift:

The Australian Resuscitation council guidelines show how to do this:

One hand is placed on the forehead or the top of the head. The other hand is used to provide Chin Lift. The head (NOT the neck) is tilted backwards. It is important to avoid excessive force, especially where neck injury is suspected. When the person is on their side, the head will usually remain in this position when the rescuer’s hands are withdrawn.

Chin lift is commonly used in conjunction with Backward Head Tilt. The chin is held up by the rescuer’s thumb and fingers in order to open the mouth and pull the tongue and soft tissues away from the back of the throat. See ANZCOR Guideline 4 – January 2016 – Page

Breathing

Checking for Breathing is the next step of the DRSABCD action plan. Breathing determines what we do next. If someone isn’t breathing they need CPR quickly. How do you check for breathing? It’s by a simple test called the look listen and feel test. You’ll find this easier in the stress of an emergency rather than looking for a pulse.

Look: Place your hand on the patients chest. Look for the rise and fall of the chest.
Listen: Place your cheek near the patients mouth, you will be able to hear if they are breathing
Feel: With your cheek near the patients mouth, you will be able to feel air if they are breathing.

Using this test you should be able to find evidence of breathing within 10 seconds. If you have been checking for 10 seconds and haven’t found any signs, chances are they aren’t breathing. In that case, starting CPR will lead to a better outcome.

Here’s How to do the look listen and feel check.

When determining whether someone is breathing or not, something you likely may see is that the patient is gasping for air. This is what is known as agonal breathing. One study showed that this is common in 40% of cardiac arrest patients. Gasping is not true breathing, it is a reflex action. What does that mean for you? If an unconscious person is gasping, give them CPR. Don’t assume that gasping is breathing.

a person gives cpr in a first aid course high shutter speed image

CPR

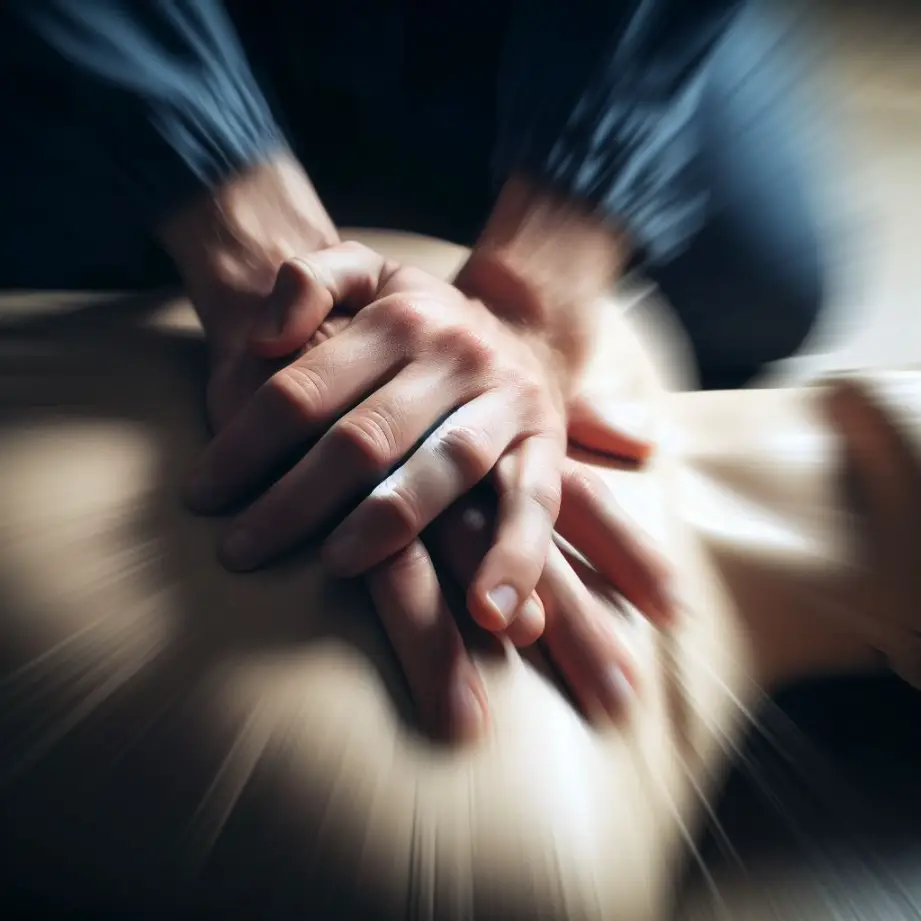
If we have determined that a person is not breathing, it’s time to move to the C, of the DRSABCD action plan: CPR. CPR is made up of two important steps. Chest compressions and rescue breaths.

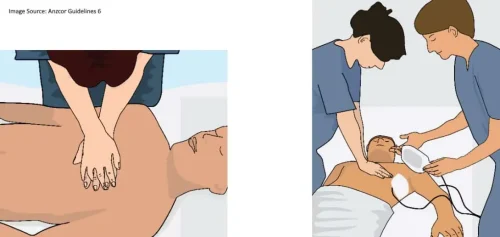
Put your palm in the centre of the chest, on the lower half of the sternum, slightly below the nipple line.
Using your body weight, push down. You should press down around 1/3 of a patients chest depth. That’s usually a little more than 5 cm on an adult. How fast and often should you push? The optimal rate for chest compressions is 100 to 120 compressions per minute which is about the same rate as songs like “Stayin Alive” by the Bee Gees or “Another One Bites The Dust” by Queen.

Common Mistakes

Compression’s not hard enough
One study showed that most people stop pushing hard enough after 1 minute and don’t realise.

Hands in wrong location
Putting your hand in the wrong location reduces the effectiveness of CPR and can damage internal organs

Too Slow or Too Fast
The optimal rate for compressions of 100-120 beats per minute makes a difference to effectiveness.

Here’s A Video Demonstrating CPR

Australian Resuscitation Council Guidelines recommend repeating this pattern: give 30 chest compressions followed by two rescue breaths.

1. Take a breath
2. Open your mouth as widely as possible and place it over the person’s slightly open mouth
3. Pinch or seal their nostrils
4. Blow to inflate their lungs.

Each breath should take approximately a second. Be careful to check that their head is still tilted slightly backwards. You don’t want to have the airway blocked by the tongue when giving rescue breaths.

You may wonder, is it safe to give rescue breaths?
The Australian Resuscitation Council Guidelines state: “The risk of disease transmission is very low and need not deter rescue breathing without a barrier device.” What can you do to make things safer? Many studies have advocated using a barrier device such as a face shield.

Rescue Breath’s Good Practice

Breathing too hard:
You want to see the persons chest rise and fall when giving rescue breaths. However if you breath too much, excess air leaves the lungs and enters the stomach which can induce vomiting.

Inadequate Air Seal:
Remember to pinch their nose. Otherwise all the air from the rescue breath will escape through the nostrils.

Do Rescue Breaths Really Matter?

Some countries, such as the USA run “hands-only” CPR programs. Does that mean breaths don’t matter? No, they still matter. Australian guidelines recommend that those who are willing and able to should give rescue breaths. Rescue Breaths lead to better outcomes. In fact, countries where “hands-only” programs are run still recommend rescue breaths as best practice.

Here’s A Video on Rescue Breaths

Defibrillation

That brings us up to the final section of the DRSABCD action plan. Defibrillation. We know that hospitals and ambulances have defibrillators, so why are we as first aiders being taught first aid? For good reason. In an emergency, the quicker someone receives defibrillation, the better the outcome.

One study of found that the survival rate for victims who received their defibrillation within the first 3 minutes was 74%. For those who received their first defibrillation after the first 3 min, the survival rate was only 49%. That’s a huge difference! Another study trained more than 19,000 community members in Defibrillator usage. Not only did early defibrillation save more lives, but it lead to more people surviving post defibrillation.

Think about your home or work. How long will it take an ambulance to arrive? Would it come in three minutes or less? Likely not. Having a defibrillator at your workplace or in the home could save lives!

The Australian resuscitation council says that for every minute defibrillation is delayed, there is approximately 10% reduction in survival if the patient has suffered a sudden cardiac arrest. 33,000 people suffer a sudden cardiac arrest out of hospital each year. Less than 10% will survive. Early defibrillation could mean 70-80% survive. That could mean more than 20,000 lives saved each year

As we can see quick defibrillation has lifesaving results. We could say that the final D is one part of DRSABCD that gives the biggest chance of survival. So how do you use a defibrillator?

The first important step is to prepare the patient. Often a small preparation kit is kept with the defibrillator. It often includes scissors, a cpr faceshield, towlette, and shaving razor. You’ll need to have the patients chest exposed to apply the defibrillator pads. You could try removing their clothes, but that could take too much time. So using the scissors quickly cut their clothes off. If their chest is hairy it could mean that the defibrillator pads wont stick. In that case, use the shaving razor to shave where you will apply the pads. What is the point of the towlette? Water and electricity don’t mix. If you’ve pulled someone out of the water and need to defibrillate use the towlette to dry them. However, remember the emphasis on quick defibrillation. Prolonging the preparation period could result in a bad outcome.

Once the defibrillator is there, press the on button. The defibrillator will coach you through the process. It will tell you to apply the defibrillator pads remove them from the defibrillator and apply them to the patient. Place one pad slightly below the collar bone on the person’s right chest above the nipple and one pad on the person’s left side below the arm pit.

Next up, the defibrillator will tell you to step back while it analyses the patients heart rhythm. What does this mean? When a person has a cardiac arrest, the signal from the brain to the heart is interrupted causing the heart to “fibrillate” or we could say “quiver.” The defibrillator analyses to see if this is what the heart is doing before giving a shock.

If the heart is fibrillating, the defibrillator will then apply a shock. It may take multiple shocks before a person is revived. If the heart is not fibrillating, the defibrillator will say shock not advised and then tell you to continue giving CPR.

Myth: A defibrillator can shock a beating heart.
Fact: A defibrillator won’t shock a heart thats beating normally.

Myth: You need to be trained to use a defibrillator.
Fact: While training is important, anyone can attempt to use a portable AED in an emergency.

Myth: It’s like jump starting a car
Fact: It’s not. The shock actually momentarily stops the heart to allow it to correct its rhythms.

Myth: AED’s are expensive
Fact: AED’s can be less than $2000 and last a long time. Most have 8 year warranties. Saving a life could cost less than $250 a year.

DRSABCD Wrap Up


We hope this guide has given you a solid understanding of DRSABCD. There are quite a few steps to remember, but having them locked in your mind can make all the difference in an emergency.

To help you see it all in action, check out the video below—it brings everything together so you can visualize the process.

Want to take it a step further? Join one of our first aid courses and get hands-on practice so you’re ready when it counts. Stay tuned for more first aid tips! 🚑💪

Stay First Aid Ready!

Subscribe now for exclusive discounts and life-saving tips.